P-Card Expenses
From shopwiki
Purchases under $3500 CAD can be done through the UBC Purchase Card (P-Card). All information related to the P-Card can be found in this handbook. For the purpose of this wiki document, some of the instruction covering P-Card transactions reconciliation will be repeated here. All employees who have been issued a P-Card must follow these instructions:
- Each card has a default speedchart and account code which is automatically assigned to each transaction made by that card. Payment of transactions will be automatically debited to those defaults unless otherwise specified by manually changing them within Centresuite.
- The statement is available online for reconciliation purposes throughout the cycle which runs from the 16th of every month to the 15th of the following month. Cardholders can view their statement and make changes to their default speedchart and account code anytime within the monthly cycle as well as an additional 2 weeks at the end of each cycle. The cycle will close every month on the 25th and all transactions will be vouchered.
- At any point between the 16th and 25th of every month, the employee must do the following (even if you haven't used your P-card during the last billing period):
- Log on to your Centersuite account.
- Go in “Expenses” → “View Transactions”. In the drop-down menu of Date Range, select “Monthly Statement (Last)” and click “Run Search”. All transactions done during the last billing period will be displayed. For each transaction:
- Change the Speedchart and FMS Account to the correct one. If the transaction was carried out for a specific WO, enter the Speedchart which correspond to that WO.
- Write a short description of the expense. If the transaction was carried out for a specific WO, the description should start with the WO ID number followed by a "/", then by a short description. Example: E17-024 / Enclosures.
- If the transaction contains multiple items that have to be charged to different speecharts, the transaction must be split into multiple charges. To split a transaction, click on its grey circle under the "Actions" column ("Split Transaction" pops-up when hovering the cursor above the circle). This will bring you to the "Split Transactions" tool where you can choose to split it by amount or by percent and select the number of splits. For each new line, enter a description, an amount (or percent), a speedchart, and a FMS account. (Important: each line's description must follow the same rules as described in step 2.2.)
- Once finished, go to “Reports” → “Standard Reports” and click on “Statement of Account Report” (number 1200) (commonly called P-Card Report). In the drop-down menu of Date Range, select “Monthly Statement (Last)” and click “Run”. It usually takes a few minutes for the report to be ready. To see the report status, go to “Reports” → “View Output Log”. When the report is ready for download, a folder icon will appear next to the file name under “Download File”. Click on the folder icon to download the report.
- Move the report .pdf file to the following destination:
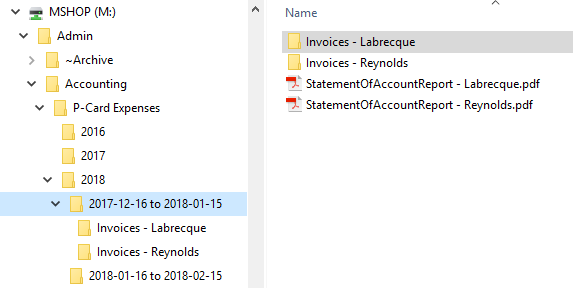
- For Mshop and Stores staff: In the folder \Admin\Accounting\P-Card Expenses\<Billing Period> of the M: drive.
- For E-lab staff: In the folder \Admin\Accounting\P-Card Expenses\<Year>\<Billing Period> of the L: drive.
- Rename the file to the following template: StatementOfAccountReport - <Last Name>.pdf
- In the current folder, create a new folder named: Invoices – <Last Name>. Put the invoice for each transaction shown on the Statement of Account Report in this folder. Refer to the picture for an example.
- For all transactions made for specific WO, put a copy of the transaction invoice into the "Accounting" folder of that WO on the network drive.
- Print the Statement of Account Report and all related invoices. Sign the report and give the package to the Technical Services Director for verification and approval.
Return to Main Page.
